CSS Optimization Tools for Boosting PWA Performance
20hrs
16mins
16secs
20hrs
16mins
16secs
20hrs
16mins
16secs
20hrs
16mins
16secs
CSS Optimization Tools for Boosting PWA Performance
When styling websites or PWAs with CSS, you should analyze how CSS resources will affect performance. In this tutorial, we’ll use various tools and related techniques to help build a better PWA by focusing on CSS optimization. Specifically, we’ll remove the unused CSS, inline the critical path CSS, and minify the resulting code.
The techniques can also be used to improve the performance of general websites and apps. We’ll be focusing on CSS optimization for PWAs since they should be fast and feel native on user devices.
Progressive web apps (PWAs) are web experiences that bring the best of both worlds: native mobile apps (installable from a store) and web apps (reachable from public URLs). Users can start using the application right away from their web browser without waiting for a download, installing, or needing extra space in the device.
Service workers and caching allow the app to work offline and when network connectivity is poor. Over time, the app could become faster as more assets are cached locally. PWAs can also be installed as an icon on the home screen and launched full-screen with an initial splash screen.
The Demo PWA to Audit
Before learning how to audit a PWA for any CSS issues, you can get the code of a simple website with PWA features from this GitHub repository. The PWA uses an unminified version of Bootstrap v4 for CSS styling and displays a set of posts fetched from a statically generated JSON API. You can also use the hosted version of this demo, since learning how to build a PWA is beyond the scope of this tutorial.
PWAs are simply web apps with additional features, including these elements:
A manifest file. A JSON file provides the browser with information about the web application such as name, description, icons, the start URL, display factors etc.
A service worker. A JavaScript file is used to cache the application shell (the minimum required HTML, CSS, and JavaScript for displaying the user interface) and proxying all network requests.
HTTPS. PWAs must be served from a secure origin.
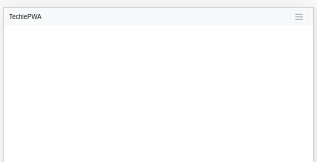
Here’s a screen shot of the application shell:
A screen shot of the application with data:

Auditing with Google’s Lighthouse
Lighthouse is an open-source auditing tool developed by Google. It can be used to improve the performance, accessibility and SEO of websites and progressive web apps.
Lighthouse can be accessed from the Audit tab in Chrome DevTools, programatically as a Node.js module and also as a CLI tool. It takes a URL and runs a series of audits to generate a report with optimization suggestions.
You can apply different techniques either manually or using tools. This article describes how such tools can be used to remove redundant styles, extract the above-the-fold critical CSS, load the remaining CSS with JavaScript, and minify the resulting code.
Launch Chrome, visit the PWA address https://www.techiediaries.com/unoptimizedpwa/ and open Developer Tools (CTRL-Shift-I). From the Developer Tools, click the Audits panel:
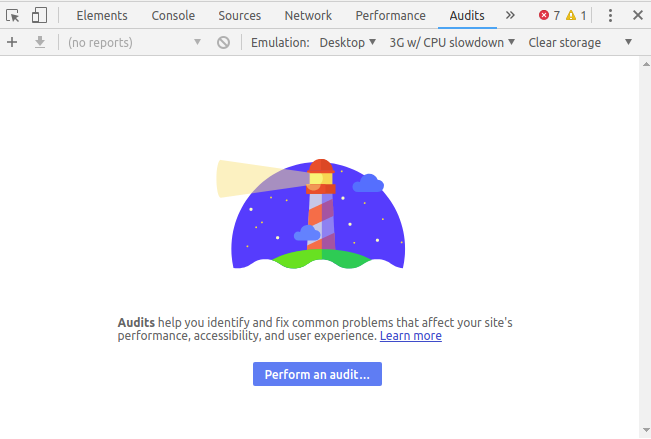
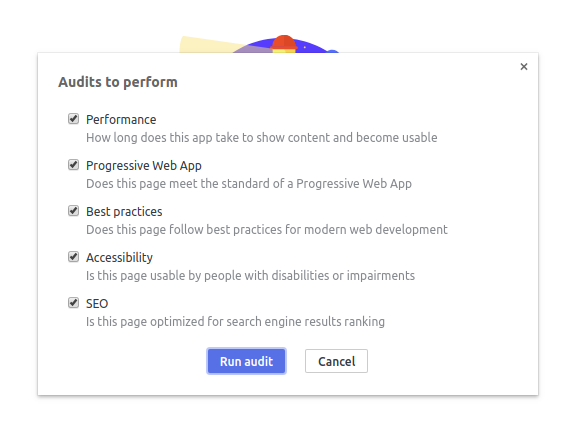
Next, click on Perform an audit…. A dialog will prompt you for the types of audit you want to perform. Keep all types selected and click the Run audit button.
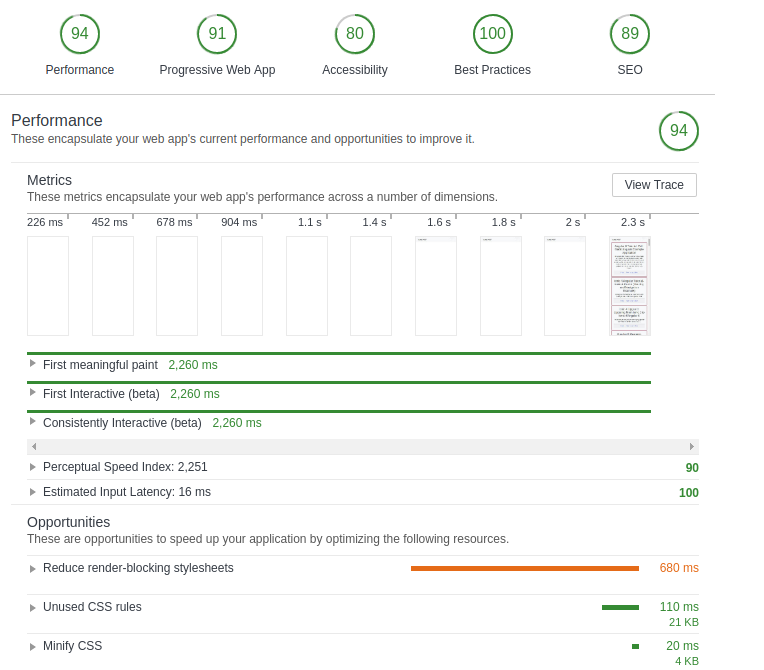
Wait for Lighthouse to complete the auditing process and generate a report:
The scores are calculated in a simulated environment. You’re unlikely to get the same results on your machine because they depend on hardware and network capabilities.
From the report, you can see a timeline which visually shows how the page is loaded. First meaningful paint, First Interactive and Consistently Interactive are key time points that describe how fast the page loaded. Our goal is to optimize these metrics according to the Critical Rendering Path.
Critical Rendering Path
The critical rendering path represents the steps the browser must take before it can render an initial page view (the visible area of the page or the “above-the-fold” area). When you visit a URL, the browser:
- starts to download the HTML which is parsed as it streams
- identifies and downloads external assets such as CSS, JavaScript, fonts and images
- parses and renders as necessary.
Asset downloading and parsing can be done in parallel for assets such as images. However, CSS and JavaScript are render-blocking: the browser halts further processing until the file is downloaded and parsed. This is necessary because browsers are single-threaded and anything could occur. For example, the page redirects to another URL or changes layout styles.
Page performance should improve if the number of render-blocking assets is reduced.
CSS Optimization Using Lighthouse Opportunities
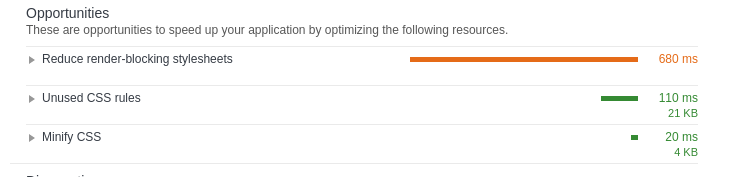
Lighthouse provides guidelines to help optimize the application in the Opportunities section of the report. There are three suggestions to improve performance:
- reduce render-blocking CSS
- eliminate unused CSS rules
- minify CSS.
CSS Optimization: Removing Unused CSS Rules
Let’s start with the second Lighthouse opportunity, which relates to unused CSS rules. Expand the Unused CSS rules opportunity:
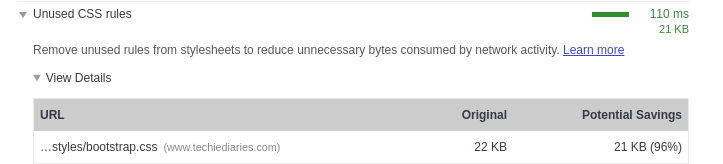
Lighthouse estimates that 96% of the CSS in the bootstrap.css file is unused by the application. If we eliminate the unused CSS, network activity will reduce accordingly.
All the tools described here can be used as part of build system such as webpack, Gulp or Grunt, but this tutorial uses them on the command line.
To eliminate the unused CSS styles, we’ll use PurifyCSS. Make sure you have Node.js installed on your machine, then install the tool globally using npm:
$ npm install -g purify-css
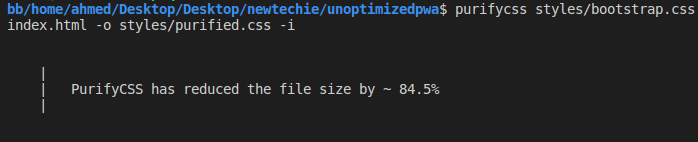
Next, make sure you’re inside your unoptimizedpwa folder and run the command:
$ purifycss styles/bootstrap.css index.html -o styles/purified.css -i
- The first argument is the CSS file to purify.
- The second argument is the HTML file to check for used styles.
- The
-ooption specifies the path and name of the result file to create. - The
-ioption instructs the tool to display information about how much CSS was removed.
(An -m option instructs the tool to minify the purified CSS, but we’ll use another tool for minification below.)
In this case, we see PurifyCSS has reduced the file size by ~ 84.5%. This is not quite the 96% identified by Lighthouse, but the tools use different techniques.
You can also use other tools to remove unused CSS such as uncss and you can read this article by Addy Osmani for more information.
You can now remove the original styles/bootstrap.css file and rename styles/purified.css to styles/bootstrap.css.
Reduce Render-Blocking CSS
If we expand the Reduce render-blocking stylesheets opportunity, we can see more details:
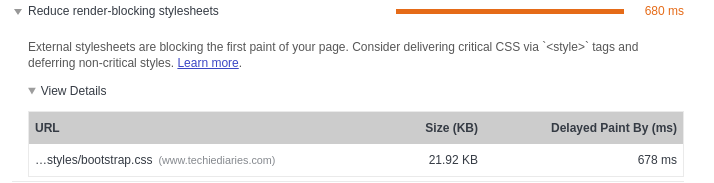
The bootstrap.css file delays the first paint of our application by 678ms. Not all styles are necessary for above-the-fold rendering, so we can do the following:
- Extract the critical CSS from
bootstrap.cssand inline it in theindex.htmlfile using a<style>tag. This reduces the number of HTTP requests and is less code for the browser to parse. - Deliver the remaining non-critical styles after the top of the page has rendered.
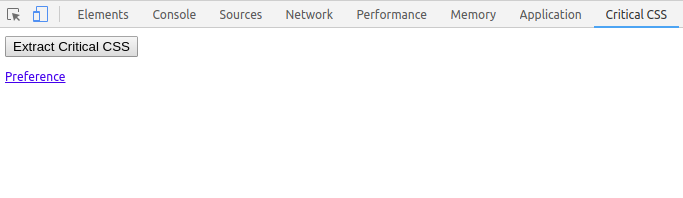
We’ll use Critical CSS Extractor, a Chrome extension to extract Critical CSS rules for the current page. Once you’ve installed this extension, you’ll see a new panel — Critical CSS — in DevTools.
Chrome does the hard work for us. Open DevTools again with the site still active and select the Critical CSS tab. Click the Extract Critical CSS button to download the critical CSS file:
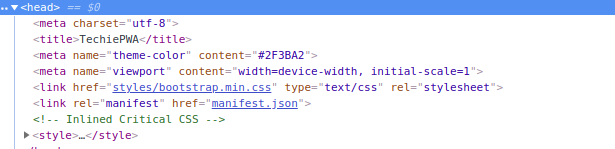
Open index.html and add the content of this critical CSS file within a <style> tag in the HTML <head>.
Unminified CSS
The CSS file is still required with all styles, but we can minify it to reduce its size.
Expand the Minify CSS opportunity in the Lighthouse audit:
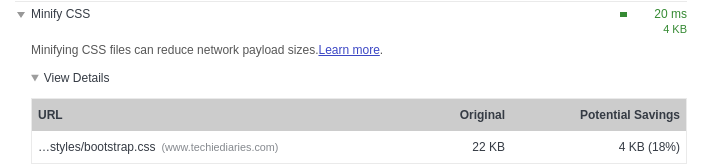
To minify the file, we can use tools such as:
cssnano— a modular minifier, built on top of PostCSS
csso — a CSS minifier with structural optimizations.
To use cssnano, from the unoptimizedpwa folder, run the following command to install cssnano locally:
npm install cssnano
Next, install the PostCSS CLI globally using:
npm install postcss-cli --global
Add a new file named postcss.config.js with the following (default) cssnano configuration parameters:
module.exports =
 plugins: [
 require('cssnano')(
 preset: 'default',
 ),
 ],
;
The cssnano guide provides more information about configuration presets.
Minify the bootstrap.css file by running:
postcss styles/bootstrap.css > styles/bootstrap.min.css
Deferring Bootstrap Loading with JavaScript
To prevent the CSS file from render-blocking, it can be loaded at the end of the page using JavaScript after the DOM is ready. Add the following JavaScript code snippet to index.html just before the closing </body> tag:
<script>
const link = document.createElement('link');
link.href = 'styles/bootstrap.min.css';
link.type = 'text/css';
link.rel = 'stylesheet';
const link0 = document.getElementsByTagName('link')[0];
link0.parentNode.insertBefore(link, link0);
</script>
If you inspect your DOM after the page has loaded, you’ll find the inserted <link> tag inside the <head> tag:
Checking the Optimizations
We can run Lighthouse again against the optimized PWA. The results:
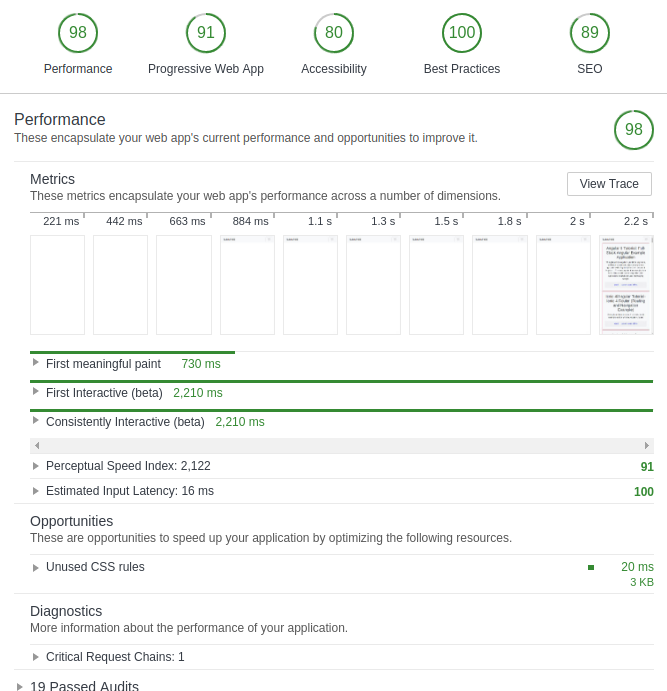
The performance score has improved.
Lighthouse still reports further unused CSS rules could be removed. This could occur because PurifyCSS doesn’tt remove similar named selectors.
The final optimized PWA is available from this GitHub repository.
Similar Tools
There are many alternative tools to the ones we used in this tutorial. Here’s a list of well-known tools for purifying, minifying and extracting critical CSS:
csso — a CSS minifier with structural optimizations
critical, a tool by Addy Osmani to extract and inline critical-path CSS in HTML pages
uncss, a tool for removing unused CSS from your stylesheets that works across multiple files and supports Javascript-injected CSS
purgecss, a tool for removing unused CSS.
Conclusion
In this tutorial, we moved towards CSS optimization by removing redundant code, inlining critical assets and minifying the resulting CSS. As a result, the PWA will download quicker and render faster. Similar tools and techniques can be used on your sites and apps for optimizing CSS to increase performance.
OneSignal.push(function()
OneSignal.sendTags(
htmlcss: 'htmlcss',
);
);
CSS Optimization Tools for Boosting PWA Performance
When styling websites or PWAs with CSS, you should analyze how CSS resources will affect performance. In this tutorial, we’ll use various tools and related techniques to help build a better PWA by focusing on CSS optimization. Specifically, we’ll remove the unused CSS, inline the critical path CSS, and minify the resulting code.
The techniques can also be used to improve the performance of general websites and apps. We’ll be focusing on CSS optimization for PWAs since they should be fast and feel native on user devices.
Progressive web apps (PWAs) are web experiences that bring the best of both worlds: native mobile apps (installable from a store) and web apps (reachable from public URLs). Users can start using the application right away from their web browser without waiting for a download, installing, or needing extra space in the device.
Service workers and caching allow the app to work offline and when network connectivity is poor. Over time, the app could become faster as more assets are cached locally. PWAs can also be installed as an icon on the home screen and launched full-screen with an initial splash screen.
The Demo PWA to Audit
Before learning how to audit a PWA for any CSS issues, you can get the code of a simple website with PWA features from this GitHub repository. The PWA uses an unminified version of Bootstrap v4 for CSS styling and displays a set of posts fetched from a statically generated JSON API. You can also use the hosted version of this demo, since learning how to build a PWA is beyond the scope of this tutorial.
PWAs are simply web apps with additional features, including these elements:
A manifest file. A JSON file provides the browser with information about the web application such as name, description, icons, the start URL, display factors etc.
A service worker. A JavaScript file is used to cache the application shell (the minimum required HTML, CSS, and JavaScript for displaying the user interface) and proxying all network requests.
HTTPS. PWAs must be served from a secure origin.
Here’s a screen shot of the application shell:
A screen shot of the application with data:
Auditing with Google’s Lighthouse
Lighthouse is an open-source auditing tool developed by Google. It can be used to improve the performance, accessibility and SEO of websites and progressive web apps.
Lighthouse can be accessed from the Audit tab in Chrome DevTools, programatically as a Node.js module and also as a CLI tool. It takes a URL and runs a series of audits to generate a report with optimization suggestions.
You can apply different techniques either manually or using tools. This article describes how such tools can be used to remove redundant styles, extract the above-the-fold critical CSS, load the remaining CSS with JavaScript, and minify the resulting code.
Launch Chrome, visit the PWA address https://www.techiediaries.com/unoptimizedpwa/ and open Developer Tools (CTRL-Shift-I). From the Developer Tools, click the Audits panel:
Next, click on Perform an audit…. A dialog will prompt you for the types of audit you want to perform. Keep all types selected and click the Run audit button.
Wait for Lighthouse to complete the auditing process and generate a report:
The scores are calculated in a simulated environment. You’re unlikely to get the same results on your machine because they depend on hardware and network capabilities.
From the report, you can see a timeline which visually shows how the page is loaded. First meaningful paint, First Interactive and Consistently Interactive are key time points that describe how fast the page loaded. Our goal is to optimize these metrics according to the Critical Rendering Path.
Critical Rendering Path
The critical rendering path represents the steps the browser must take before it can render an initial page view (the visible area of the page or the “above-the-fold” area). When you visit a URL, the browser:
- starts to download the HTML which is parsed as it streams
- identifies and downloads external assets such as CSS, JavaScript, fonts and images
- parses and renders as necessary.
Asset downloading and parsing can be done in parallel for assets such as images. However, CSS and JavaScript are render-blocking: the browser halts further processing until the file is downloaded and parsed. This is necessary because browsers are single-threaded and anything could occur. For example, the page redirects to another URL or changes layout styles.
Page performance should improve if the number of render-blocking assets is reduced.
CSS Optimization Using Lighthouse Opportunities
Lighthouse provides guidelines to help optimize the application in the Opportunities section of the report. There are three suggestions to improve performance:
- reduce render-blocking CSS
- eliminate unused CSS rules
- minify CSS.
CSS Optimization: Removing Unused CSS Rules
Let’s start with the second Lighthouse opportunity, which relates to unused CSS rules. Expand the Unused CSS rules opportunity:
Lighthouse estimates that 96% of the CSS in the bootstrap.css file is unused by the application. If we eliminate the unused CSS, network activity will reduce accordingly.
All the tools described here can be used as part of build system such as webpack, Gulp or Grunt, but this tutorial uses them on the command line.
To eliminate the unused CSS styles, we’ll use PurifyCSS. Make sure you have Node.js installed on your machine, then install the tool globally using npm:
$ npm install -g purify-css
Next, make sure you’re inside your unoptimizedpwa folder and run the command:
$ purifycss styles/bootstrap.css index.html -o styles/purified.css -i
- The first argument is the CSS file to purify.
- The second argument is the HTML file to check for used styles.
- The
-ooption specifies the path and name of the result file to create. - The
-ioption instructs the tool to display information about how much CSS was removed.
(An -m option instructs the tool to minify the purified CSS, but we’ll use another tool for minification below.)
In this case, we see PurifyCSS has reduced the file size by ~ 84.5%. This is not quite the 96% identified by Lighthouse, but the tools use different techniques.
You can also use other tools to remove unused CSS such as uncss and you can read this article by Addy Osmani for more information.
You can now remove the original styles/bootstrap.css file and rename styles/purified.css to styles/bootstrap.css.
Reduce Render-Blocking CSS
If we expand the Reduce render-blocking stylesheets opportunity, we can see more details:
The bootstrap.css file delays the first paint of our application by 678ms. Not all styles are necessary for above-the-fold rendering, so we can do the following:
- Extract the critical CSS from
bootstrap.cssand inline it in theindex.htmlfile using a<style>tag. This reduces the number of HTTP requests and is less code for the browser to parse. - Deliver the remaining non-critical styles after the top of the page has rendered.
We’ll use Critical CSS Extractor, a Chrome extension to extract Critical CSS rules for the current page. Once you’ve installed this extension, you’ll see a new panel — Critical CSS — in DevTools.
Chrome does the hard work for us. Open DevTools again with the site still active and select the Critical CSS tab. Click the Extract Critical CSS button to download the critical CSS file:
Open index.html and add the content of this critical CSS file within a <style> tag in the HTML <head>.
Unminified CSS
The CSS file is still required with all styles, but we can minify it to reduce its size.
Expand the Minify CSS opportunity in the Lighthouse audit:
To minify the file, we can use tools such as:
cssnano— a modular minifier, built on top of PostCSS
csso — a CSS minifier with structural optimizations.
To use cssnano, from the unoptimizedpwa folder, run the following command to install cssnano locally:
npm install cssnano
Next, install the PostCSS CLI globally using:
npm install postcss-cli --global
Add a new file named postcss.config.js with the following (default) cssnano configuration parameters:
module.exports =
 plugins: [
 require('cssnano')(
 preset: 'default',
 ),
 ],
;
The cssnano guide provides more information about configuration presets.
Minify the bootstrap.css file by running:
postcss styles/bootstrap.css > styles/bootstrap.min.css
Deferring Bootstrap Loading with JavaScript
To prevent the CSS file from render-blocking, it can be loaded at the end of the page using JavaScript after the DOM is ready. Add the following JavaScript code snippet to index.html just before the closing </body> tag:
<script>
const link = document.createElement('link');
link.href = 'styles/bootstrap.min.css';
link.type = 'text/css';
link.rel = 'stylesheet';
const link0 = document.getElementsByTagName('link')[0];
link0.parentNode.insertBefore(link, link0);
</script>
If you inspect your DOM after the page has loaded, you’ll find the inserted <link> tag inside the <head> tag:
Checking the Optimizations
We can run Lighthouse again against the optimized PWA. The results:
The performance score has improved.
Lighthouse still reports further unused CSS rules could be removed. This could occur because PurifyCSS doesn’tt remove similar named selectors.
The final optimized PWA is available from this GitHub repository.
Similar Tools
There are many alternative tools to the ones we used in this tutorial. Here’s a list of well-known tools for purifying, minifying and extracting critical CSS:
csso — a CSS minifier with structural optimizations
critical, a tool by Addy Osmani to extract and inline critical-path CSS in HTML pages
uncss, a tool for removing unused CSS from your stylesheets that works across multiple files and supports Javascript-injected CSS
purgecss, a tool for removing unused CSS.
Conclusion
In this tutorial, we moved towards CSS optimization by removing redundant code, inlining critical assets and minifying the resulting CSS. As a result, the PWA will download quicker and render faster. Similar tools and techniques can be used on your sites and apps for optimizing CSS to increase performance.
OneSignal.push(function()
OneSignal.sendTags(
htmlcss: 'htmlcss',
);
);
CSS Optimization Tools for Boosting PWA Performance
CSS Optimization Tools for Boosting PWA Performance
CSS Optimization Tools for Boosting PWA Performance
CSS Optimization Tools for Boosting PWA Performance
When styling websites or PWAs with CSS, you should analyze how CSS resources will affect performance. In this tutorial, we’ll use various tools and related techniques to help build a better PWA by focusing on CSS optimization. Specifically, we’ll remove the unused CSS, inline the critical path CSS, and minify the resulting code.
The techniques can also be used to improve the performance of general websites and apps. We’ll be focusing on CSS optimization for PWAs since they should be fast and feel native on user devices.
Progressive web apps (PWAs) are web experiences that bring the best of both worlds: native mobile apps (installable from a store) and web apps (reachable from public URLs). Users can start using the application right away from their web browser without waiting for a download, installing, or needing extra space in the device.
Service workers and caching allow the app to work offline and when network connectivity is poor. Over time, the app could become faster as more assets are cached locally. PWAs can also be installed as an icon on the home screen and launched full-screen with an initial splash screen.
The Demo PWA to Audit
Before learning how to audit a PWA for any CSS issues, you can get the code of a simple website with PWA features from this GitHub repository. The PWA uses an unminified version of Bootstrap v4 for CSS styling and displays a set of posts fetched from a statically generated JSON API. You can also use the hosted version of this demo, since learning how to build a PWA is beyond the scope of this tutorial.
PWAs are simply web apps with additional features, including these elements:
A manifest file. A JSON file provides the browser with information about the web application such as name, description, icons, the start URL, display factors etc.
A service worker. A JavaScript file is used to cache the application shell (the minimum required HTML, CSS, and JavaScript for displaying the user interface) and proxying all network requests.
HTTPS. PWAs must be served from a secure origin.
Here’s a screen shot of the application shell:
A screen shot of the application with data:
Auditing with Google’s Lighthouse
Lighthouse is an open-source auditing tool developed by Google. It can be used to improve the performance, accessibility and SEO of websites and progressive web apps.
Lighthouse can be accessed from the Audit tab in Chrome DevTools, programatically as a Node.js module and also as a CLI tool. It takes a URL and runs a series of audits to generate a report with optimization suggestions.
You can apply different techniques either manually or using tools. This article describes how such tools can be used to remove redundant styles, extract the above-the-fold critical CSS, load the remaining CSS with JavaScript, and minify the resulting code.
Launch Chrome, visit the PWA address https://www.techiediaries.com/unoptimizedpwa/ and open Developer Tools (CTRL-Shift-I). From the Developer Tools, click the Audits panel:
Next, click on Perform an audit…. A dialog will prompt you for the types of audit you want to perform. Keep all types selected and click the Run audit button.
Wait for Lighthouse to complete the auditing process and generate a report:
The scores are calculated in a simulated environment. You’re unlikely to get the same results on your machine because they depend on hardware and network capabilities.
From the report, you can see a timeline which visually shows how the page is loaded. First meaningful paint, First Interactive and Consistently Interactive are key time points that describe how fast the page loaded. Our goal is to optimize these metrics according to the Critical Rendering Path.
Critical Rendering Path
The critical rendering path represents the steps the browser must take before it can render an initial page view (the visible area of the page or the “above-the-fold” area). When you visit a URL, the browser:
- starts to download the HTML which is parsed as it streams
- identifies and downloads external assets such as CSS, JavaScript, fonts and images
- parses and renders as necessary.
Asset downloading and parsing can be done in parallel for assets such as images. However, CSS and JavaScript are render-blocking: the browser halts further processing until the file is downloaded and parsed. This is necessary because browsers are single-threaded and anything could occur. For example, the page redirects to another URL or changes layout styles.
Page performance should improve if the number of render-blocking assets is reduced.
CSS Optimization Using Lighthouse Opportunities
Lighthouse provides guidelines to help optimize the application in the Opportunities section of the report. There are three suggestions to improve performance:
- reduce render-blocking CSS
- eliminate unused CSS rules
- minify CSS.
CSS Optimization: Removing Unused CSS Rules
Let’s start with the second Lighthouse opportunity, which relates to unused CSS rules. Expand the Unused CSS rules opportunity:
Lighthouse estimates that 96% of the CSS in the bootstrap.css file is unused by the application. If we eliminate the unused CSS, network activity will reduce accordingly.
All the tools described here can be used as part of build system such as webpack, Gulp or Grunt, but this tutorial uses them on the command line.
To eliminate the unused CSS styles, we’ll use PurifyCSS. Make sure you have Node.js installed on your machine, then install the tool globally using npm:
$ npm install -g purify-css
Next, make sure you’re inside your unoptimizedpwa folder and run the command:
$ purifycss styles/bootstrap.css index.html -o styles/purified.css -i
- The first argument is the CSS file to purify.
- The second argument is the HTML file to check for used styles.
- The
-ooption specifies the path and name of the result file to create. - The
-ioption instructs the tool to display information about how much CSS was removed.
(An -m option instructs the tool to minify the purified CSS, but we’ll use another tool for minification below.)
In this case, we see PurifyCSS has reduced the file size by ~ 84.5%. This is not quite the 96% identified by Lighthouse, but the tools use different techniques.
You can also use other tools to remove unused CSS such as uncss and you can read this article by Addy Osmani for more information.
You can now remove the original styles/bootstrap.css file and rename styles/purified.css to styles/bootstrap.css.
Reduce Render-Blocking CSS
If we expand the Reduce render-blocking stylesheets opportunity, we can see more details:
The bootstrap.css file delays the first paint of our application by 678ms. Not all styles are necessary for above-the-fold rendering, so we can do the following:
- Extract the critical CSS from
bootstrap.cssand inline it in theindex.htmlfile using a<style>tag. This reduces the number of HTTP requests and is less code for the browser to parse. - Deliver the remaining non-critical styles after the top of the page has rendered.
We’ll use Critical CSS Extractor, a Chrome extension to extract Critical CSS rules for the current page. Once you’ve installed this extension, you’ll see a new panel — Critical CSS — in DevTools.
Chrome does the hard work for us. Open DevTools again with the site still active and select the Critical CSS tab. Click the Extract Critical CSS button to download the critical CSS file:
Open index.html and add the content of this critical CSS file within a <style> tag in the HTML <head>.
Unminified CSS
The CSS file is still required with all styles, but we can minify it to reduce its size.
Expand the Minify CSS opportunity in the Lighthouse audit:
To minify the file, we can use tools such as:
cssnano— a modular minifier, built on top of PostCSS
csso — a CSS minifier with structural optimizations.
To use cssnano, from the unoptimizedpwa folder, run the following command to install cssnano locally:
npm install cssnano
Next, install the PostCSS CLI globally using:
npm install postcss-cli --global
Add a new file named postcss.config.js with the following (default) cssnano configuration parameters:
module.exports =
 plugins: [
 require('cssnano')(
 preset: 'default',
 ),
 ],
;
The cssnano guide provides more information about configuration presets.
Minify the bootstrap.css file by running:
postcss styles/bootstrap.css > styles/bootstrap.min.css
Deferring Bootstrap Loading with JavaScript
To prevent the CSS file from render-blocking, it can be loaded at the end of the page using JavaScript after the DOM is ready. Add the following JavaScript code snippet to index.html just before the closing </body> tag:
<script>
const link = document.createElement('link');
link.href = 'styles/bootstrap.min.css';
link.type = 'text/css';
link.rel = 'stylesheet';
const link0 = document.getElementsByTagName('link')[0];
link0.parentNode.insertBefore(link, link0);
</script>
If you inspect your DOM after the page has loaded, you’ll find the inserted <link> tag inside the <head> tag:
Checking the Optimizations
We can run Lighthouse again against the optimized PWA. The results:
The performance score has improved.
Lighthouse still reports further unused CSS rules could be removed. This could occur because PurifyCSS doesn’tt remove similar named selectors.
The final optimized PWA is available from this GitHub repository.
Similar Tools
There are many alternative tools to the ones we used in this tutorial. Here’s a list of well-known tools for purifying, minifying and extracting critical CSS:
csso — a CSS minifier with structural optimizations
critical, a tool by Addy Osmani to extract and inline critical-path CSS in HTML pages
uncss, a tool for removing unused CSS from your stylesheets that works across multiple files and supports Javascript-injected CSS
purgecss, a tool for removing unused CSS.
Conclusion
In this tutorial, we moved towards CSS optimization by removing redundant code, inlining critical assets and minifying the resulting CSS. As a result, the PWA will download quicker and render faster. Similar tools and techniques can be used on your sites and apps for optimizing CSS to increase performance.
Stuff We Do
Premium
Versioning
Forums
References
About
Our Story
Press Room
Contact
Contact Us
FAQ
Write for Us
Advertise
Legals
Terms of Use
Privacy Policy
Stuff We Do
Premium
Versioning
Forums
References
About
Our Story
Press Room
Contact
Contact Us
FAQ
Write for Us
Advertise
Legals
Terms of Use
Privacy Policy

 Clash Royale CLAN TAG#URR8PPP
